Adding assets individually
Inputting your assets into the system one by one is the easiest and most failsafe method, if any of the following apply:
- You’re not particularly confident at using databases and spreadsheets.
- You only have a few assets to add.
- You have a lot of assets, but they’re not listed on a spreadsheet or similar computer-based system.
To add a new asset, navigate to ‘Asset’ / ‘Add new asset’.
If you have already added your various ‘categories’ into the system beforehand (such as Manufacturers, Models and Locations), then adding new assets is a bit easier. For instructions on how to do this, see this link here.
If however, you’re halfway through adding an asset, and find that you want to add a new category (such as manufacturer or model) which isn’t already in the system, you can do so by selecting “Other” from the drop-down list. This opens a new space to the right of the dropdown, where you can add your new category.
When you submit your new asset, then if there’s any missing data on the form, or data which is in a format the computer’s not able to understand, then the form will flag-up whatever’s needing your attention, and await your corrections / additions. Missing data might be something like a blank space where you should have selected the likes of a ‘manufacturer’ or ‘location’. Data in the wrong format might be, for example, a descriptive word where the computer is expecting to find a number, or the date written as text (eg, “10th of February last yr”) when it’s expecting to find something along the lines of the DD/MM/YYYY or a similar format (eg, 10/02/2013).
If all is well, then when you hit the ‘submit’ button, it will confirm that your asset (and any relevant new category) has been added to the system.
Batching-in multiple assets using the batch-upload method
This is the fastest method to use if all of the following apply:
- You’re reasonably confident using spreadsheets and/or databases.
- You have a large number of assets.
- Your assets are listed on a spreadsheet or similar computer-based system.
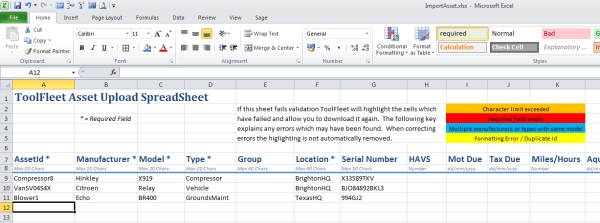
To access this feature, h ead to “manage”, then “transfer data”, scroll down to find the “batch upload” bit near the foot of the page (you’ll find it immediately underneath the bit where you upload your logo), and follow on-screen instructions.
The upload-download uses a spreadsheet to batch info into the database. The template is a Microsoft Excel “xlsx” file type (Excel 2007 and onwards). It unfortunately cannot read the older “xls” files.
Note – When batching in assets, you need to be careful to keep your ‘category’ data consistent, to avoid accidental duplicates, under the headings “Manufacturer”, “Model”, “Type” and “Location”. By this, we mean you have to spell these ‘category’ bits of data exactly the same, each time they appear on the batch-spreadsheet. For example, when allocating “locations” for assets, you wouldn’t write “16 West Haven Street” in one entry, and “16 Westhaven St” in another entry, or they’d be created twice in the system as two separate locations. The good news is, that once the data’s in VibeCalc itself, you’ll always be presented with dropdown menus to pick categories like “location” from. It’s only at the “batch-import” stage when consistent spelling of categories is an issue.
1. Management tips, for successful implementation of your maintenance system.
2. Set up new users’ accounts.
3. Upload your logo.
4. Give all your assets a unique ID.
5. Setting up ‘categories’.
6. Add your assets individually, or upload multiple assets in a batch.
7. Establish vibration ratings for your equipment.
8. Times when you might want to make use of paper forms, instead of keying data in directly.


